Easy Note-taking from the Command-line
Background
There’s so many solutions for taking notes out there. But despite this I couldn’t find something that just worked and had all the features I wanted:
- Cloud sync
- Markdown composing
- Quick creation
- Quick to find with fuzzy find
- View in the terminal with formatting/highlighting
So let’s build one.
## Quickly Create a Note
To quickly create a note and open it in my $EDITOR (I use NeoVim), we’ll create a simple bash script.
#!/bin/sh
if [ $# -eq 0 ]
then
  echo "-----------------"
  echo "Create a new note"
  echo "-----------------"
  echo "Usage:"
  echo "note <note name>"
else
  file=${1%.*}
  $EDITOR $HOME/Documents/notes/$file.md
fi
We can save this script somewhere in $PATH (e.g. /usr/local/bin) and make it executable to easily use it (I called this file “note”).
sudo chmod u+x /usr/local/bin/noteWe can now create a markdown file in ~/Documents/notes and open it in our default text editor by typing:
note <note name>Finding and viewing notes
Okay, we’ve not really achieved that much yet so let’s take it up a notch by creating a script that lets us quickly search for and view notes.
This script will make use of the fantastic FZF, a Fuzzy Finding tool as well as Glow a command-line Markdown viewer. You’ll need to make sure both of these are installed if you’re following along.
#!/bin/sh

find_note() {
  local file

  file="$(find $HOME/Documents/notes -iname '*.md' -exec basename -s .md {} \; | fzf --bind 'J:preview-down,K:preview-up' --height 100% --preview 'if file -i {}|grep -q binary; then file -b {}; else glow -s dark $HOME/Documents/notes/{}.md; fi')"

  if [[ -n $file ]]
  then
     $EDITOR $HOME/Documents/notes/"$file".md
  fi
}

find_note $1
Phew, that was a mouthful. So what’s going on here?
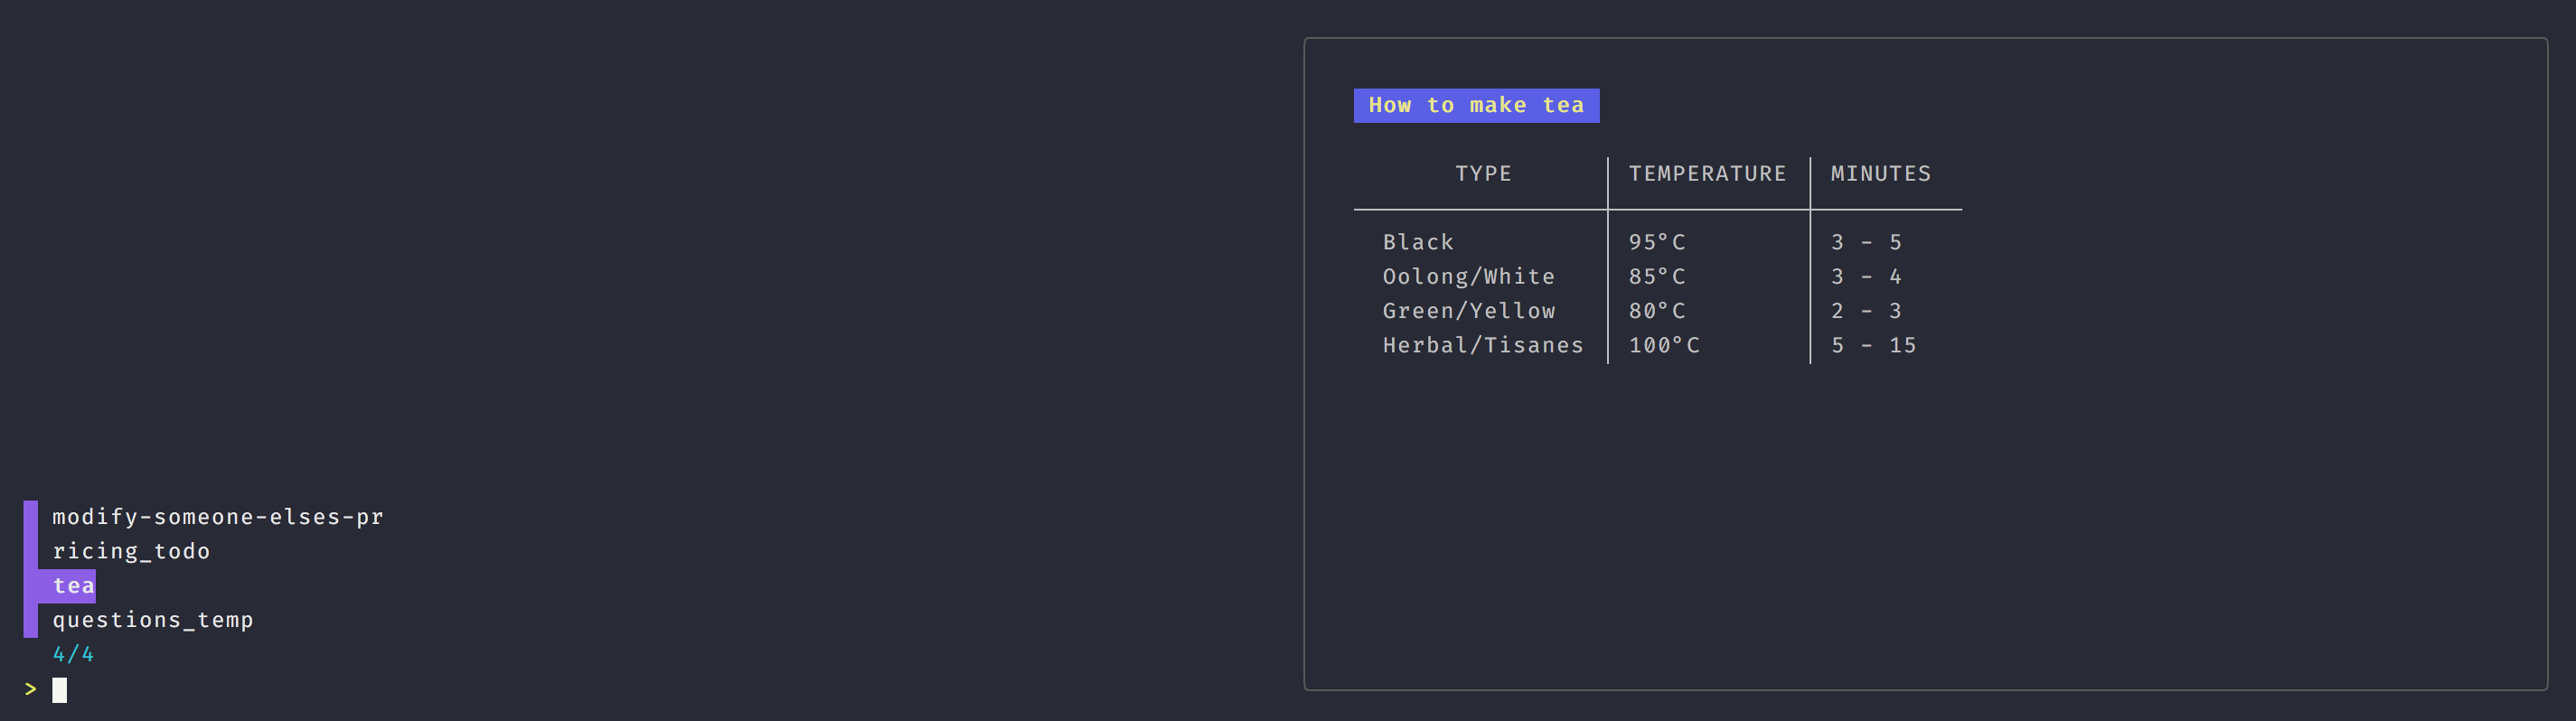
Basically, we’re using FZF to allow you to search the files in your notes directory, we’re then getting Glow to render a nice preview of the highlighted file as well as setting up some key bindings.
You can use CTRL+J/K to scroll up and down your list and SHIFT+J/K to scroll the preview up and down. Pressing enter opens the file up in your default text editor. Typing anything else filters the results.
Once again, we’ll want to save this to the same place we saved the first script and make it executable. (I called this one notes).
We can now try running this using notes.
Great! This is getting pretty useful already. In fact, if you don’t have multiple computers and don’t want backup, you could just stop here. Otherwise, let’s move on.
Syncing notes
If you’re on something like a Mac, that supports an official client (e.g. the Google Drive app). You can set up a folder on your hard drive to automatically sync. In which case you could just change your notes directory to something like: ~/Drive/notes. However, if you’re on Linux, one of the best approaches in my opinion is to use Rclone.
Edit: /u/worldpotato1 pointed out that another great way to sync would be to use Git. This would provide slightly more overhead in terms of having to commit and push your changes, but on the flip side, would be simpler to set up than Rclone and has the added benefit of giving you full version control.
Rclone supports a load of different Cloud Storage providers. I’m not going to cover setting up the Rclone config in this article but you can follow one of the tutorials on the Rclone site (I called my configuration google:notes).
Once we have an account configured, we can integrate Rclone into our script. Let’s update our notes file.
#!/bin/sh

find_note() {
  local file

+  if ! pgrep -x "rclone" > /dev/null
+  then
+    rclone mount google:notes /media/notes --daemon
+    sleep 5
+  fi

-  file="$(find $HOME/Documents/notes -iname '*.md' -exec basename -s .md {} \; | fzf --bind 'J:preview-down,K:preview-up' --height 100% --preview 'if file -i {}|grep -q binary; then file -b {}; else glow -s dark $HOME/Documents/notes/{}.md; fi')"
+  file="$(find /media/notes -iname '*.md' -printf '%P\n' | sed -e 's/\.md$//' | fzf --bind 'J:preview-down,K:preview-up' --height 100% --preview 'if file -i {}|grep -q binary; then file -b {}; else glow -s dark /media/notes/{}.md; fi')"

  if [[ -n $file ]]
  then
     $EDITOR /media/notes/"$file".md
  fi
}

find_note $1
So you can see that we’re now using /media/notes instead of ~/Documents/notes. This is the virtual drive created and mounted by Rclone which will be automatically synced.
We’re also checking if Rclone is running and mounting the folder if needed.
Let’s add that same check to note as well.
#!/bin/sh
+if ! pgrep -x "rclone" > /dev/null
+then
+  rclone mount google:notes /media/notes --daemon
+  sleep 5
+fi

if [ $# -eq 0 ]
then
  echo "-----------------"
  echo "Create a new note"
  echo "-----------------"
  echo "Usage:"
  echo "note <note name>"
else
  file=${1%.*}
-  $EDITOR $HOME/Documents/notes/$file.md
+  $EDITOR /media/notes/$file.md
fi
That’s it. You may need to chmod /media/notes so that you don’t need sudo every time you mount the drive. Otherwise there shouldn’t be any issues.
Enjoy 😃